Showing posts with label bed design. Show all posts

Sunday, June 16, 2013

Lesson Learned and a Little Rearranging

Last year, when my (now former) voice teacher and his wife gave us lots of pass-along plants to fill in my bare flower beds, I just plunked everything in the ground and hoped for the best. I didn't do any research, and I didn't really consider how they would fill in, what things would look like during the winter (bare) or how far they should be from the house.

During a conversation a couple months ago with my great aunt, I heard the term "foundation plant" for the first time. As she explained it, a foundation plant is one that is okay to plant near the foundation of a house because its roots are not invasive (aka: the roots won't grow into the foundation of the house, thereby ruining the foundation).  It also usually has a more compact growth habit, rather than something flowy or fountain-like. The other cool thing about this conversation: my 90-year-old great aunt walked around the house at the farm with my parents (the one that my grandfather built) and identified every bush and flower, making note of which were foundation plants and which were not.

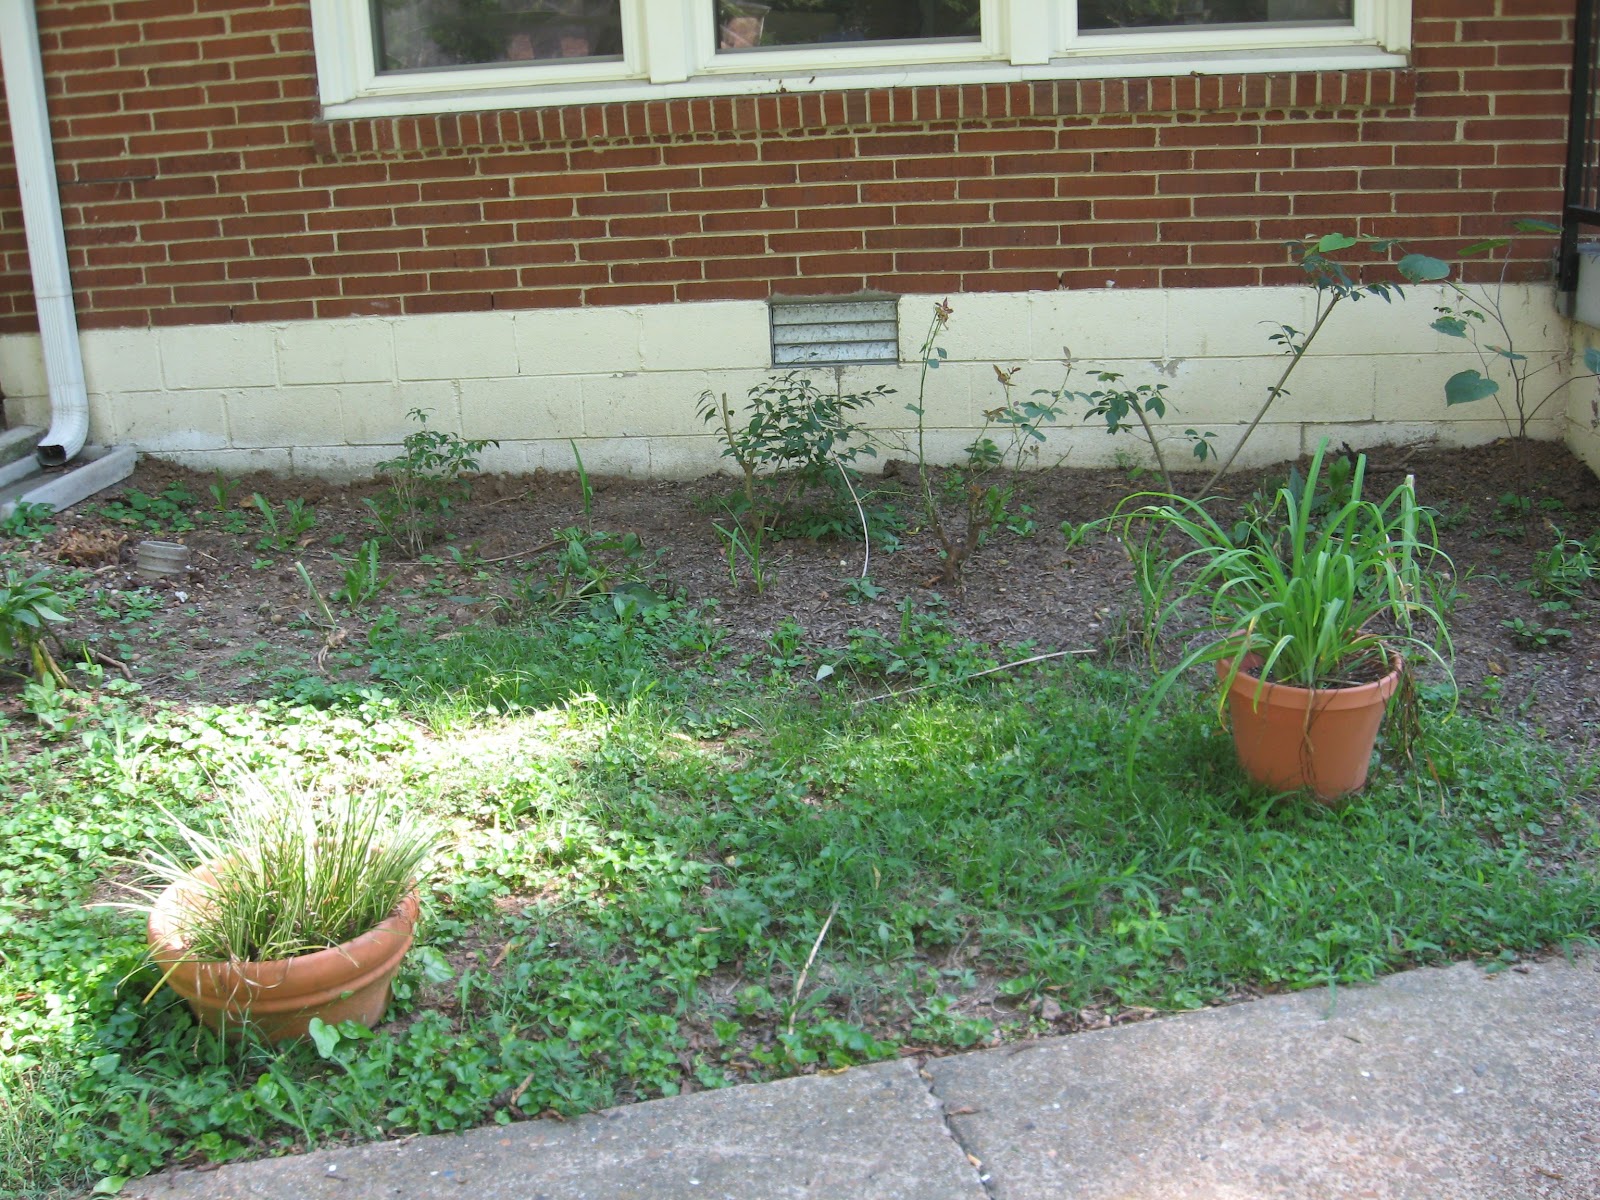
This conversation made me wonder if the forsythia bushes I planted at the back of the flower beds (near the house) were foundation plants (if you squint, you can see the small leafy bushes in the back row).


I hopped on Google and started searching away, and, of course, forsythia are most definitely not foundation plants. Fortunately, they hadn't been there all that long, so I don't think any damage was done.

Around the same time I dug up that tidbit of information, my friend Patrick (who is a master gardener) mentioned to me that the red bud (in the pic above, it's on the far right with the heart shaped leaves) needed to be moved soon. See, when I planted it, I thought it was a shrub. WRONG. It's definitely a tree. Pat's comment was "Yeah...you know that seven foot tall tree by our driveway? That's a red bud."

So I started brainstorming places to put four-five forsythia and a small-ish tree. Fortunately, it didn't take long. I decided to put the red bud in the opposite corner from the hybuscus at the front of the yard. Here she blows, a little peeked looking, but otherwise none the worse for wear. Please ignore the downed mailbox in the background. That is a story for another day.


As for the forsythia, on the other side of our driveway, is a narrow strip of grass that is constantly forgotten. It always seems like a waste to restart the lawnmower just to mow the 3 foot wide section of grass, but it has to be done. I decided to forgo the issue and plant a forsythia hedge.


Once these fill in, I don't think we'll have to mow over here any more, but I am considering putting down weed cloth and mulch, just to be sure.

Once I got everything moved, I was left with this...and a similar situation in the other front flower bed.


Needing ideas, I took this picture, along with a few others, up to Bates Nursery (they are a local, family-owned nursery about 10 minutes away). One of the employees tossed out a couple of ideas once he'd seed the pictures and heard the description of sun, but told me that before I made any decisions, I should go home, measure the beds and the window heights above them, and come back with a rough sketch of what I'm working with. Here's what I came up with. Obviously my musical talents don't translate to the visual arts.


Armed with the sketches, I went back to Bates, where a second (and very helpful) employee helped me choose plants, figure out how many I needed, and helped me figure out a layout for both front beds. I only left with shrubs for the left bed that day...partially for budgetary reasons (three shrubs were $100) and partially to break up the work for myself.

Since there is a gardenia to the right of the front stairs, I decided to mirror that on the left. Bates didn't have exactly the same kind of gardenia, but they helped me pick out one that has similar foliage (Kleim's Hardy). The only noticeable difference is that the flowers on the new one are single, instead of double flowers.


To contrast the gardenia in the left bed, I also picked out a Georgia Petite Indian Hawthorn. It has lovely blue green leaves that look a little bit waxy, and it blooms small white flowers in the spring.


Has anyone else been rearranging their garden? Planting shrubs? Digging holes is hard work! Oh well, hopefully I'll get lovely toned arms out of it.

Monday, October 1, 2012

More Fall Plantings

The rest of my fall planting order has arrived! Woo hoo! Here's what I've got:

Moon River Peony
California Hard Neck Garlic
Naturalizing Daffodils
Apricot Beauty Tulips

With that, and the fall season, comes some to-do's:
  1. Find spots for and plant my new goodies!
  2. Plant bulbs given to me by my voice teacher and his wife (I have a giant tray full of bulbs! Mostly daffodil...they think)
  3. Plant more green onions, lettuce and mustard greens
  4. Clean out pots. I have some iris and daylilies in containers from the apartment that I have been waiting to plant in the ground. Others are just past their prime and are looking scraggly or need to be brought inside before it gets too cold.
  5. Stir compost and add leaves as they fall and are raked up
What does your fall clean-up/to-do list look like?

Thursday, August 23, 2012

Re-Establishing Flower beds

It's been a little chaotic around here the past couple weeks, but in between the chaos (and the heat....and the mosquitoes that try to eat my face every time I step out the door), I have been hard at work trying to re-establish the flower beds in front of the house. So far, I've got one down (thankfully, the larger of the two), one to go.

If you will recall, the left flower bed looked something like this when we moved in (after I added some gifted plants)

Giant mass of weeds. Yikes. I have to admit, I was really dreading pulling all of them, so I started looking for other ways to get rid of them.

I read somewhere that you could use newspaper as a temporary, cheaper, biodegradable weed cloth under mulch, so I decided to give it a try.

I did pull the worst of the weeds, just so it was easier to lay the newspaper down, and laid down a couple layers of newspaper, soaking them with water as I went so they didn't fly off in any unexpected breezes. Once I got a reasonable-sized area covered, I used pine bark mulch (the cheap stuff....not Scotts brand or anything...that would have gotten expensive in a hurry!!) to cover the newspaper so my neighbors wouldn't talk bad about me haha.

Here's an in-process picture.


When I ran out of newspaper, I decided to take a break. That break turned into a two-week break. Oops. That was about the time the mosquitoes got really bad and started trying to eat us every time we stepped out the door.


This morning I resolved to get back on it. I tried to go to Kroger (which is supposed to open round the clock) to by more newspaper, but they were closed for some reason or another, so on to Home Depot I went for more mulch and to see if they had some kind of paper that might be serviceable. Man, am I glad. Here's what I found.
I'm hoping this stuff will actually work better than newspaper, since it's thicker. Plus, I can use the leftovers on other projects instead of just tossing/recycling whatever is left.

Scissors and giant roll of paper in hand, I got down to business, again, soaking the paper as I went to avoid shifting.

This paper went much faster than newspaper since I didn't have to put down multiple layers or deal with flimsiness.

Then, I mulched, and stood back to admire my handiwork.


The plants that are already here should grow together some. I also have an order in for things like tulip and daffodil bulbs...and a peony!

So now that I've gotten to show off a little, now comes the part where I hang my head in shame and promise to fix this....like tomorrow...

Again. Yikes. Oh, and see E.T. peeking out the basement window? That would be my husband's sense of humor at work.

Any major gardening projects you've been tackling? Any you are dreading/putting off?

Tuesday, July 31, 2012

Building New Raised Beds

I've been planning to put in some raised beds for flowers and vegetables since we moved in last month. I have to admit, I've been procrastinating, but finally, they are in and ready for planting!

There are a couple things that make putting in raised beds in this yard a little more complicated than at the old place. We discovered the soil in our yard is extremely rocky and hard to dig (we discovered this when we went to plant the hydrangea and had to invest in a pickaxe), plus our yard is sloped, so I either have to dig out a level spot (lots of work!), or build the bed in such a way as to accommodate the slope (which seems like it could get complicated).

After much deliberation, I decided that digging would be the way to go. I figured that I'd have to dig out the ground under the beds a little bit anyway, so I might as well create a level spot while I'm at it. Plus, after redoing our fire pit, I was pretty confident that I could do the whole leveling thing.

All the same, I wanted as level a spot as possible to begin with. Here's the spot I chose (before I started digging).


I decided to start with two 4'x4' boxes. I figure I can always add more later if I need the extra space. After conferring with the very helpful guy at Home Depot, I also decided to use pressure treated pine for the construction. I considered cedar boards, since they are rot resistant without all the chemicals of pressure treated wood, but they are significantly more expensive. Plus, I would have needed to stain/seal them, which puts back all the chemicals I was thinking to avoid by using cedar.

Four 2x10x8's (each cut in half to make 4' sections), a couple of galvanized corner brackets, and some decking screws later, I was home with my materials...which sat there for the better part of a week while I hemmed and hawed about all the digging I was going to have to do.

Saturday came, and I got up the nerve to start digging after I mowed the lawn (I was already sweaty and gross, might as well keep going, right?).


I got the first bed dug and quasi-level before realizing it was really going to take an extra set of hands to get the boxes built.

So I called in reinforcements (thanks Pat!) and Sunday morning, the boxes were built and put in the ground in no time! Here's the end result...


As you can probably see, I still need to add a little dirt to the one on the left. Here's a close up on that one...

You can see where I put the little bit of mushroom compost I had leftover from planting peppers in the retaining wall bed when I ran out of garden soil. I mixed the topsoil I had dug out with garden soil, but underestimated how much garden soil I was going to need. Oh well....good thing Home Depot is close by!

So what do you think? Just in time for some fall planting, right? Speaking of which, I picked up a few seeds that I'll be planting this week!

Monday, July 30, 2012

More Pass-Along Plants

I've mentioned before how much I love pass along plants not only as a way to get plants for your garden on the cheap, but as a way to keep your beds from getting over-crowded.

A few months ago, my voice teacher and his wife dug up about half the plants in their garden while they were clearing space for workers to build them a new retaining wall. They new we were in the process of buying a house, so they said they would keep the plants they weren't going to put back in pots for us until we had a place to put them. Very sweet of them!

So a couple of weeks ago, I went and picked up all the plants that were waiting for us. There were several forsythia bushes, a red bud, some shasta daisies, rudbeckia and flox and some ornamental grass (meant for borders). I spent a couple hours the next day placing, planting and watering all those plants. Fortunately, the soil was easy to dig (unlike in the back yard), so getting everything in the ground wasn't too hard. Here's what it looks like now:
Left Bed

Right Bed
I still have some filling in to do. These beds are quite large. I also need to put some newspaper down to kill the weeds and grass, and then mulch on top of it to give the beds some definition.

I noticed today my rudbeckia is starting to bloom!

And my flox! Huzzah!


Sunday, July 8, 2012

Introducing....A Blank Slate (Part II)

Man is it hot here! I don't know what the weather is like where you are, but we've been breaking records left and right here in Nashville - and since we haven't had rain in over a month now, things are looking pretty brown and crunchy outside. I've been out early in the mornings watering before it gets so hot that any water will evaporate before it can do any good.

But enough about the weather. Here is my new back yard!

The previous owner graded the lawn to run into the creek on the other side of the fence so the house, and in doing so, created this retaining wall that makes a nice patio space. We're planning to use something like cobblestones to eventually pave in this space. You can see (kind of) where someone had dumped a bunch of gravel to try to create a patio space, but the weeds have taken over since it was last taken care of.

You can see where all my plants were pretty unceremoniously dumped when we were hurriedly moving everything in. I've spread them out a little since then.

Here, you can see I was in a hurry to get at least some of my vegetables in the ground. The retaining wall has a pretty handy built in bed, so I've been gradually planting the veggies I started back in February, adding mushroom compost to the soil as I go to give things a little boost.

I do have to figure out what to do with the two scraggly rose bushes in the retaining wall. Any suggestions??

We do have a pretty awesome deck....

...That's built right up to this gigantic hackberry tree. It will probably eventually come down. You can't tell from the picture, but it (and one other tree back here) hangs over the house, and the other tree is even closer to the house than this one!

We also have (actually, that's a had now...I'll do a post on it soon) a gigormous fire pit. Seriously, this thing is like 7 feet in diameter. The previous owners could have roasted pigs in this baby.

The only problem is that the border is just random rocks piled up in a circle, and if you so much as tap them, the go rolling away (maybe a bit of a safety hazard if there's actually a fire going).

Just beyond the firepit, we'll put a toolshed and a compost bin.

And here is where (I think) I'm going to put some raised beds.

So there you have it....my new backyard!

Friday, July 6, 2012

Introducing.....a Blank Slate (Part I)

Whew! We are all moved in, and though we are still unpacking, I thought I'd share my blank slate of a yard with you all. I'm going to split this post into two in the interest of not writing the longest blog post EVER, so without further ado, I present to you my front yard.

First (and yes, I know this isn't technically the front yard), here's what our garage looks like....well....kind of. Right now, we'll call it Mt. Box ok?

Before you get too scared, here is a wider shot....no....we did not have boxes piled five feet high through our entire garage (just part of it).

Actually, at the bottom of that picture, you can see my first little indoor project happening (shelf painting!), but we'll talk more about that later.

Here's the front of the house from the end of the driveway. Not terribly exciting (yet), but we're getting there. The gigantic hackberry tree next to the driveway is going to come down probably this winter. Hackberries spit a sap that ruins the paint on cars, so one hanging over the driveway is really not ideal, especially since the garage is not going to stay a garage.

Not really sure what these little trees/bushes are off to the left of the driveway, but I am going to have to trim them back so they don't invade the driveway as well as getting the vines off of them.

Now this, I am pretty excited about. We have a lovely hibiscus bush in the front yard. You can see the end of the pretty purple blooms (it was covered in them a few weeks earlier).

There is all kinds of ivy growing up the trees in the front and back yards. We actually tackled getting it all off of the trees last weekend. The vines look great, but they bore into the trees and can kill them.


You can actually see the little tendrils the vines send out to attach themselves to the tree. No good!!

Moving on....I now present you with the ugliest lollipop ever.....
This guy has already been removed as well (I'll get some after pictures soon!). There are/were a couple problems with this: it blocks one entire window in the living room (not cool), it was growing up into the power line to the house (really not cool), and since it is so big and rotund, it also blocks the view of the path to the front door from the driveway (REALLY not cool, and a safety hazard, especially for when the hubs deploys again).

To the side of the front door, there is this wonderfully fragrant gardenia....


....and a not-so-wonderfully scraggly rose bush.....
....and that's it for what's in front of the house. Fortunately, my wonderful voice teacher and his wife have been saving some bushes they dug out of their front yard for us, so we will hopefully have something to put here soon!

Lastly, here is my awesome red front door! The porch needs to be power washed and repainted, but we've all got to start somewhere, right?


Whew! Hopefully I didn't totally bore you with all that. I am making my to-do list as I go along. What have you guys been up to? Did everyone have a great 4th?

Monday, March 26, 2012

Green Beans in the Ground

Ok, I know my average last frost date is technically not till April 15, and I may regret this later, but I just planted some of my green beans. I used a bush type (Blue Lake 274) so that I don't have to put up another trellis (I've already got one by the peas). This way, I can use the space inside the arc where the peas are planted efficiently.

As fast as beans grow, hopefully I'll have some bean sprouts soon!

With this consistently unseasonably warm weather, have you planted anything that you normally would wait to plant until later in the year?

Saturday, March 24, 2012

Potted Tulips

Ok, remember those tulip bulbs that I potted in this post? Well those tulips are beginning to emerge. Hopefully I'll have some pretty tulips just in time for Easter!

Also, my rhubarb that had plans to take over the world is now relegated to its own container until I can find a better (more permanent) place for it.

Here's a before and after of the flower bed....just so you can see the difference.