My dad always told me that the worst thing people can tell you is "no" when you ask for things (this applies to jobs, prices, auditions....really anything). I was reminded today.
I set up an appointment for an exterminator to come out and do a yearly spray for bugs some time ago. They are the same people we used last year, and we found them through a deal on LivingSocial. I was hoping to see another deal from them this year, but so far, no dice. However, after I set up the appointment, a deal came up for another extermination company (for about $20 cheaper than our exterminator's normal price).
I hemmed and hawed about calling up the exterminator we were already using to ask them to match the price. I shouldn't have worried. They called me up just this morning to ask if they could come at a different time. I used that phone call (and my willingness to be flexible) to ask them (very politely) about matching the deal. The answer? "Sure! Why not?"
And that, friends, is why it never hurts to ask.
Showing posts with label home ownership. Show all posts
Showing posts with label home ownership. Show all posts
Tuesday, July 23, 2013

Saturday, July 6, 2013
Music Room: still plugging away...kind of
So I posted these pictures of the music room as it stands today in my post about what we've accomplished this year.


And then I realized I hadn't given any sort of update after painting the floors! *face palm*
If you look at that post, you'll notice I had already painted the walls and ceiling....well, mostly anyway. Can I just go ahead and admit that I'm STILL not done painting in here? *another face palm*
It seems like I got the bulk of the painting done (the walls and ceilings) and lost steam. I've caulked painted about half of the trim. I still have some touch ups to do around the tops of the walls. I got one coat of paint up in the closet....and it's just sat like that...for a couple months now! Obviously, I've done other things in that time, but this painting project is still staring me in the face.
Does this happen to anyone else? It's not like I don't want to finish in here....believe me....I would love to wash my hands and call this room officially D.O.N.E., but I think I'm suffering from remodel fatigue. I've spent the past nine months doing this by myself (hubs has been deployed)....and even though it makes me really proud when I go back and think about all the work I've done this past year with my own hands, I think about everything that's still left to be done and it just stresses my out sometimes.
Whine....snivel.....ok I'm done. Yoga breathing....one foot in front of the other is how things get done.
Anyone else lose steam in the middle of a project and leave it sitting for months? What do you do to get over the hump?
And then I realized I hadn't given any sort of update after painting the floors! *face palm*
If you look at that post, you'll notice I had already painted the walls and ceiling....well, mostly anyway. Can I just go ahead and admit that I'm STILL not done painting in here? *another face palm*
It seems like I got the bulk of the painting done (the walls and ceilings) and lost steam. I've caulked painted about half of the trim. I still have some touch ups to do around the tops of the walls. I got one coat of paint up in the closet....and it's just sat like that...for a couple months now! Obviously, I've done other things in that time, but this painting project is still staring me in the face.
Does this happen to anyone else? It's not like I don't want to finish in here....believe me....I would love to wash my hands and call this room officially D.O.N.E., but I think I'm suffering from remodel fatigue. I've spent the past nine months doing this by myself (hubs has been deployed)....and even though it makes me really proud when I go back and think about all the work I've done this past year with my own hands, I think about everything that's still left to be done and it just stresses my out sometimes.
Whine....snivel.....ok I'm done. Yoga breathing....one foot in front of the other is how things get done.
Anyone else lose steam in the middle of a project and leave it sitting for months? What do you do to get over the hump?
Sunday, June 23, 2013
The First Year
This is the front of the house when we moved in...obviously taken by the realtor during the winter...

And here it is as it looks today.


You can see we chopped down that odd looking lollipop tree (to let more light into the living room) and added more in the way of landscaping. Oh, and here is what replaced the garage door, since it is no longer a garage.
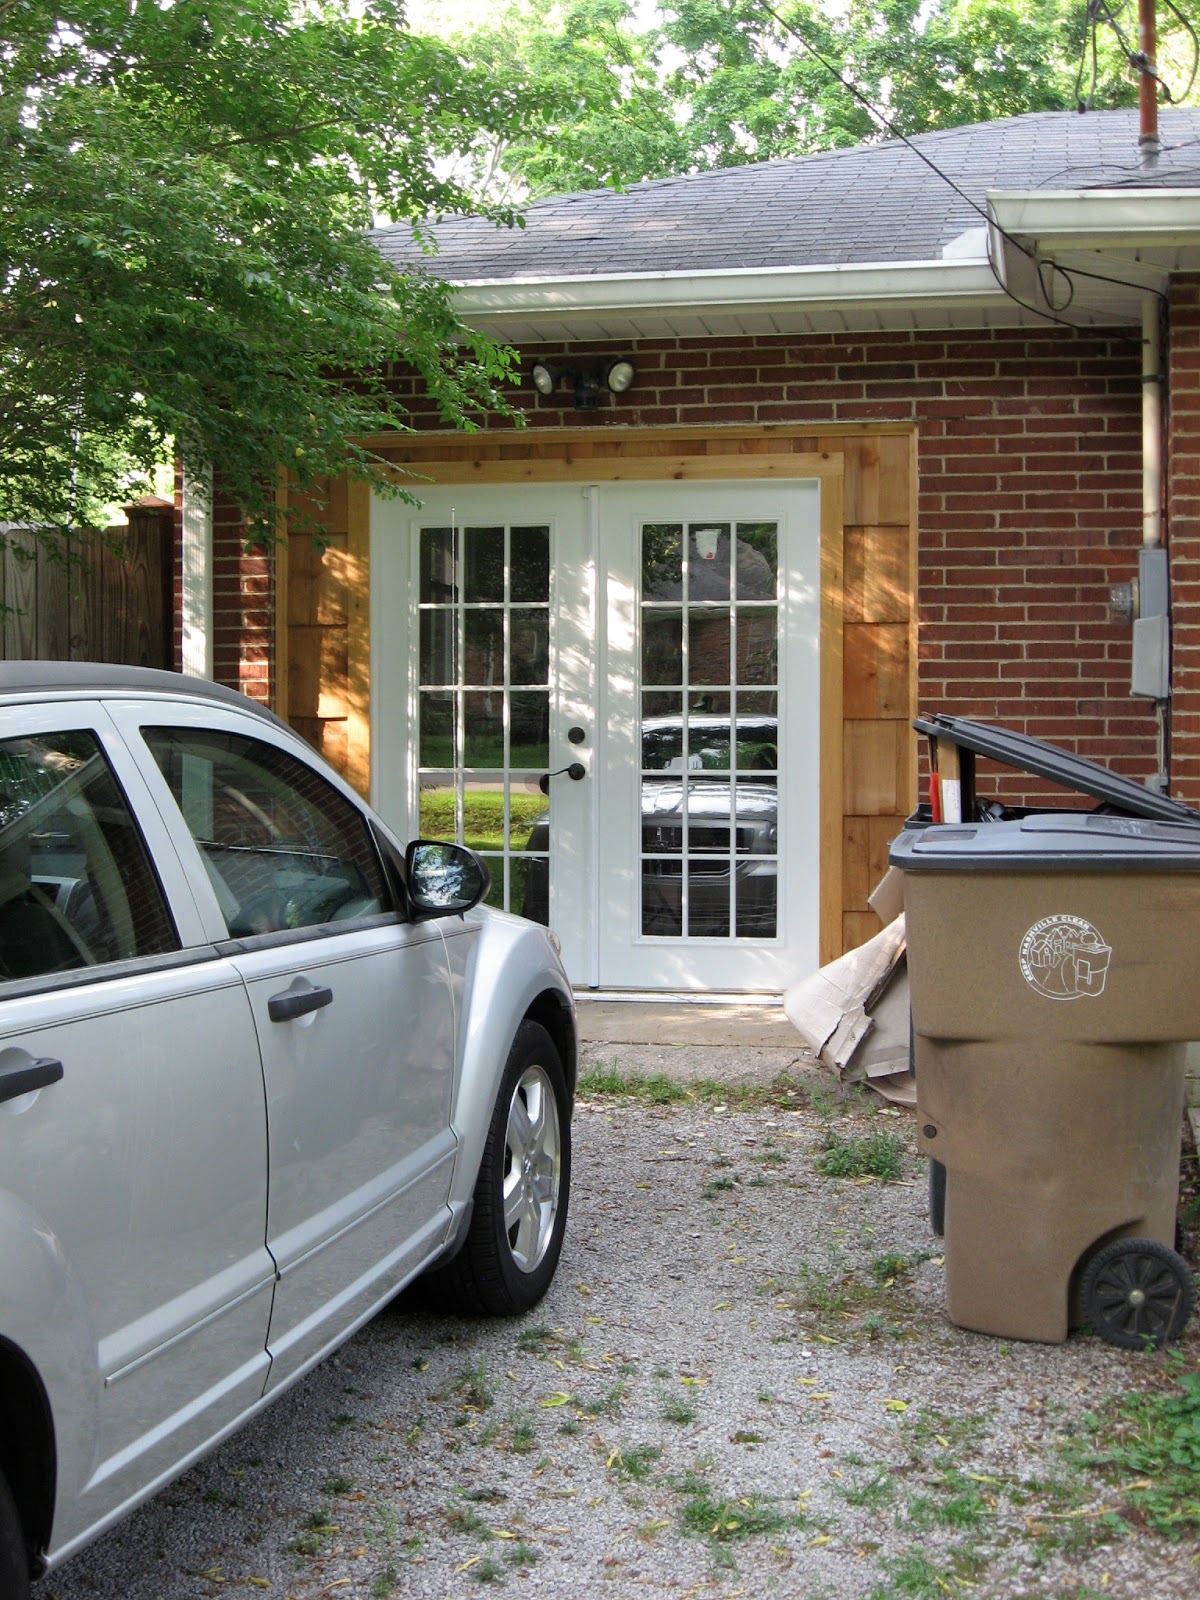
I love the cedar shake framing the door. Still trying to figure out a good place for the trash cans...hmmmm....moving on to the back of the house!
Here's the before...


And the now (I wouldn't really call it an after).

You can't see in the picture above that I've painted the back doors. Better pictures are coming!

You can see in the one above the new shed and garden boxes.

If you stepped inside the front door the day we moved in, this is what the living room looked like.


And as it looks today


Huge improvement, no? Those built-ins make a HUGE difference in the functionality of this room. I still have some playing around to do with the furniture arrangement on this side of the couch, but this room has come a long way!
Here's the kitchen before...


Obviously we haven't done much in here besides changing the appliances and painting the walls.
Here's the dining room. Lots of knotty pine....oh my, that was a lot of knotty pine...


And here's now it looks now.


I'm still in love with the Ikea light fixture in here. And I love the way this paint looks in the natural light coming in from the sliding doors.
This might be the biggest change so far....the garage....or what used to be the garage...


...and is now my music room. What a difference! It's easy to forget this room was ever a garage.


The master bedroom also looks pretty different. Here it is before...

And now. Glad that it's bright and airy...and not dead body beige anymore. Still need to add a closet though.

This is the guest bedroom as it looked when we moved in. Almost exactly the same as the master. Boring.

And now. Could be a whole different room and is so cozy!

Our crazy fiesta bathroom is still crazy and fiesta-like (yes...there are still sunflowers in the sink)...


But it looks a little more cohesive now with it's dramatic green walls, white curtain, and new light fixture. It's liveable now until we save our pennies to redo this room. In the meantime, it can induce all the giggles it likes.

Lastly, the basement. Aka...the man cave. Here it is when we moved in.

Still very cave-like (which, I suppose, is the point of a "man cave" haha), but much more comfortable.


Anyone else celebrating their "house-iversary"? Any cool before and current pictures? It amazes me what we've been able to accomplish in just a year to make this house our home!
Saturday, October 13, 2012
Changing the Furnace Filter
Oh the small joys of being a home owner...keeping up with all these small tasks that must be done on a regular/quasi regular basis. Exhibit A: Changing the furnace filter.
I have to admit from the get go that I failed to take any pictures in this process, but furnace filters are not the most interesting things. This post is more to remind myself that in three months, I need to do it again!
My understanding of furnace filters is that they are supposed to be changed every three months or so, so I didn't worry about it when we first moved into the house. Since it's been getting cooler here, I decided to check on it before we needed the heat. Let's just say that whoever replaced the furnace filter last got one that was supposed to be changed every 30 days. Let's ponder that for a moment. We've been living here for nearly four months now....gross. Makes me really glad I didn't take a picture. How embarrassing! No wonder my allergies have been so bad...
I did purchase a nicer filter this time that is supposed to last for three months. And I washed my hands thoroughly when I was finished.
I have to admit from the get go that I failed to take any pictures in this process, but furnace filters are not the most interesting things. This post is more to remind myself that in three months, I need to do it again!
My understanding of furnace filters is that they are supposed to be changed every three months or so, so I didn't worry about it when we first moved into the house. Since it's been getting cooler here, I decided to check on it before we needed the heat. Let's just say that whoever replaced the furnace filter last got one that was supposed to be changed every 30 days. Let's ponder that for a moment. We've been living here for nearly four months now....gross. Makes me really glad I didn't take a picture. How embarrassing! No wonder my allergies have been so bad...
I did purchase a nicer filter this time that is supposed to last for three months. And I washed my hands thoroughly when I was finished.
Friday, August 3, 2012
Just Call Me Davinci, Part II
I don't think I've shared this previously, but when we moved into this place, the entire house (except the wood paneled dining room) was painted tan.
Now, I don't have anything inherently against the color tan, but there are definitely more exciting colors out there. Plus, sometimes it just doesn't fit. Case and point: our bathroom.
This is what it looked like when we moved in.


Believe it or not, I actually like the crazy-colored tile (not what I would have chosen, but it's here and I figure I might as well go with it!), but the dead-colored beige made it look a little out of place.
Not wanting to bust this lovely tile out, I started scheming what I could do to make it "fit" I thought about painting the walls a bright white, but didn't think that would make the tile look any better. Then I had the thought of finding a green that would blend with the green color in the tiles!
With that plan hatched, I went hunting for the perfect green color and (with no reference besides my memory) came up with these:

The chips on the right ended up a little too much on the blue side of things, but the ones on the left ended up being perfect.

Now, keep in mind, I wasn't trying to match the tiles exactly, and the "Greenbelt" (middle left) was the same tone, but a little lighter than the darker green, and a little darker than the lighter green. I also liked that it was a little but higher drama than the one just lighter. Here's my end result:


What do you think? BIG difference right? The tile actually looks like it belongs there now!
I'm still debating whether to paint the wood trim white. The plan is to rip out that hideous sunflower sink that takes up nearly the whole room (and makes it really difficult to get through the door) and replace it with a white pedestal sink. I'd also like to put in a light with multiple bulbs and a white, water-saving toilet. The (yellow) one that's currently here is really old and must use 10 gallons every time you flush! Lastly, we either put in a medicine cabinet, or I will paint the frame of the current mirror white (it was hanging in the living room in the old apt).
Next up? The master bedroom! Told you I've been doing a lot of painting haha.
Now, I don't have anything inherently against the color tan, but there are definitely more exciting colors out there. Plus, sometimes it just doesn't fit. Case and point: our bathroom.
This is what it looked like when we moved in.


Believe it or not, I actually like the crazy-colored tile (not what I would have chosen, but it's here and I figure I might as well go with it!), but the dead-colored beige made it look a little out of place.
Not wanting to bust this lovely tile out, I started scheming what I could do to make it "fit" I thought about painting the walls a bright white, but didn't think that would make the tile look any better. Then I had the thought of finding a green that would blend with the green color in the tiles!
With that plan hatched, I went hunting for the perfect green color and (with no reference besides my memory) came up with these:

The chips on the right ended up a little too much on the blue side of things, but the ones on the left ended up being perfect.

Now, keep in mind, I wasn't trying to match the tiles exactly, and the "Greenbelt" (middle left) was the same tone, but a little lighter than the darker green, and a little darker than the lighter green. I also liked that it was a little but higher drama than the one just lighter. Here's my end result:


What do you think? BIG difference right? The tile actually looks like it belongs there now!
I'm still debating whether to paint the wood trim white. The plan is to rip out that hideous sunflower sink that takes up nearly the whole room (and makes it really difficult to get through the door) and replace it with a white pedestal sink. I'd also like to put in a light with multiple bulbs and a white, water-saving toilet. The (yellow) one that's currently here is really old and must use 10 gallons every time you flush! Lastly, we either put in a medicine cabinet, or I will paint the frame of the current mirror white (it was hanging in the living room in the old apt).
Next up? The master bedroom! Told you I've been doing a lot of painting haha.
Thursday, August 2, 2012
Just Call Me DaVinci, Part I
Actually, don't....I'm really a terrible visual artist. I can't even draw stick figures without them looking deformed. However, I have been painting....a lot.
I started in the dining room. This room has a large glass sliding door that looks out into the back yard, and my original thought was to paint it some shade of sage-ish green to make it feel sort of like a garden room. I grabbed a bunch of paint chips, taped them to the wall so I could see them in the varied lighting throughout the day, and began narrowing things down.
Once I got things narrowed to about five different chips, I called in the hubby (mostly to make sure he didn't hate any of the ones I was liking...it definitely helps narrow things down!). Wonder of wonders, he actually zoomed right in on a color and said "I like this one." So that's the color I went with. I was surprised he picked the one color that was actually aqua instead of green (it's called "Aqua Smoke"...by Behr if anyone is interested).
By the way, here's what the dining room looked like before I started painting.


I really love the amount of natural light this room gets, and you can actually tell now! Before, I felt like I needed to turn the light on every time I walked into the room...even in the middle of the day. Now it's fresh and bright.
There are a few more things I need to do before I can really consider this room "done". You can see some boxes in the picture above...I have nowhere to put my pretty china! Boo! I need to invest in a china cabinet. I also need to find some more dining room chairs as I currently only have five (and two of them are currently in the music room). I'd really like to put a great chandelier in this room....I think it would be gorgeous. I also need to hang some art on the walls and maybe add a side table or something. This is a large room, and it's currently pretty empty!
So this is my first painting project in the house....next up, the bathroom!
I started in the dining room. This room has a large glass sliding door that looks out into the back yard, and my original thought was to paint it some shade of sage-ish green to make it feel sort of like a garden room. I grabbed a bunch of paint chips, taped them to the wall so I could see them in the varied lighting throughout the day, and began narrowing things down.
Once I got things narrowed to about five different chips, I called in the hubby (mostly to make sure he didn't hate any of the ones I was liking...it definitely helps narrow things down!). Wonder of wonders, he actually zoomed right in on a color and said "I like this one." So that's the color I went with. I was surprised he picked the one color that was actually aqua instead of green (it's called "Aqua Smoke"...by Behr if anyone is interested).
By the way, here's what the dining room looked like before I started painting.


First of all, that's a lot of knotty pine!! Second, it was really bothering me that all of the wood (floors, walls, built ins) were all the exact same color! It made the room feel a little on the bland (and orange-ish) side...
So I got to painting. Let me just say, even with the help of some friends, this project took a looooong time! The grooves between the panels are actually quite ornate, which meant they all had to be done by hand, with a tiny triangle-shaped brush. It took two coats, plus touch ups to get those grooves done. Here's a closeup shot of the grooves (after paint...call it a teaser), just so you can see the level of detail.

Fortunately, the flat parts could be done with a roller.
After nearly a month of work (a few hours here and there....not constant work!) This room is finally done! At least with the painting haha. Here are the after pictures....


I really love the amount of natural light this room gets, and you can actually tell now! Before, I felt like I needed to turn the light on every time I walked into the room...even in the middle of the day. Now it's fresh and bright.
There are a few more things I need to do before I can really consider this room "done". You can see some boxes in the picture above...I have nowhere to put my pretty china! Boo! I need to invest in a china cabinet. I also need to find some more dining room chairs as I currently only have five (and two of them are currently in the music room). I'd really like to put a great chandelier in this room....I think it would be gorgeous. I also need to hang some art on the walls and maybe add a side table or something. This is a large room, and it's currently pretty empty!
So this is my first painting project in the house....next up, the bathroom!
Tuesday, July 31, 2012
Building New Raised Beds
I've been planning to put in some raised beds for flowers and vegetables since we moved in last month. I have to admit, I've been procrastinating, but finally, they are in and ready for planting!
There are a couple things that make putting in raised beds in this yard a little more complicated than at the old place. We discovered the soil in our yard is extremely rocky and hard to dig (we discovered this when we went to plant the hydrangea and had to invest in a pickaxe), plus our yard is sloped, so I either have to dig out a level spot (lots of work!), or build the bed in such a way as to accommodate the slope (which seems like it could get complicated).
After much deliberation, I decided that digging would be the way to go. I figured that I'd have to dig out the ground under the beds a little bit anyway, so I might as well create a level spot while I'm at it. Plus, after redoing our fire pit, I was pretty confident that I could do the whole leveling thing.
All the same, I wanted as level a spot as possible to begin with. Here's the spot I chose (before I started digging).


There are a couple things that make putting in raised beds in this yard a little more complicated than at the old place. We discovered the soil in our yard is extremely rocky and hard to dig (we discovered this when we went to plant the hydrangea and had to invest in a pickaxe), plus our yard is sloped, so I either have to dig out a level spot (lots of work!), or build the bed in such a way as to accommodate the slope (which seems like it could get complicated).
After much deliberation, I decided that digging would be the way to go. I figured that I'd have to dig out the ground under the beds a little bit anyway, so I might as well create a level spot while I'm at it. Plus, after redoing our fire pit, I was pretty confident that I could do the whole leveling thing.
All the same, I wanted as level a spot as possible to begin with. Here's the spot I chose (before I started digging).

I decided to start with two 4'x4' boxes. I figure I can always add more later if I need the extra space. After conferring with the very helpful guy at Home Depot, I also decided to use pressure treated pine for the construction. I considered cedar boards, since they are rot resistant without all the chemicals of pressure treated wood, but they are significantly more expensive. Plus, I would have needed to stain/seal them, which puts back all the chemicals I was thinking to avoid by using cedar.
Four 2x10x8's (each cut in half to make 4' sections), a couple of galvanized corner brackets, and some decking screws later, I was home with my materials...which sat there for the better part of a week while I hemmed and hawed about all the digging I was going to have to do.
Saturday came, and I got up the nerve to start digging after I mowed the lawn (I was already sweaty and gross, might as well keep going, right?).

I got the first bed dug and quasi-level before realizing it was really going to take an extra set of hands to get the boxes built.
So I called in reinforcements (thanks Pat!) and Sunday morning, the boxes were built and put in the ground in no time! Here's the end result...

As you can probably see, I still need to add a little dirt to the one on the left. Here's a close up on that one...

You can see where I put the little bit of mushroom compost I had leftover from planting peppers in the retaining wall bed when I ran out of garden soil. I mixed the topsoil I had dug out with garden soil, but underestimated how much garden soil I was going to need. Oh well....good thing Home Depot is close by!
So what do you think? Just in time for some fall planting, right? Speaking of which, I picked up a few seeds that I'll be planting this week!
Subscribe to:
Posts (Atom)